Activity 4: The Role of Light
ExpectationsOverall Expectations:
CRV.01 - use the concepts of media art in their own work; CRV.02 - demonstrate skills in manipulating traditional art tools related to media art; CRV.03 - demonstrate skills in manipulating new and emergent digital technologies used in creating media art; THV.03 - demonstrate an understanding of conventions as they apply to the practice of media arts production. Specific Expectations: TH1.03 - recognize and use vocabulary specific to media art. |
ContentWithout some form of light, we cannot create a photograph. The very nature of how photography works requires light, because light is what is recorded on film or the memory card.
How we get that light varies. Photographers use natural light, artificial light, or a combination of these in order to illuminate their subject. What is common is that all photographers look to use light in a way that effectively creates a three-dimensional effect, shows the subject in a flattering manner, and conveys a sense of atmosphere or mood. There are many ways a photographer uses light. The direction that the light comes from or even the type of light source will affect the subject. In a natural setting such as the outdoors, a photographer must be aware of the nature of the light. Is it hard or diffused? Is the light casting the shadows the way the photographer finds acceptable? Is it hazy or raining? Different weather conditions will affect the quality and the intensity of the light. Indoors, the photographer has to consider the amount of light and whether there is enough light to capture the subject effectively. In many instances, people simply feel that using a flash will alleviate that problem, but anyone who has ever had his/her photographs return with ‘red eye’ will understand that even flash photography has its drawbacks if not used properly. Light also has a certain colour quality to it. Warm light, such as the type of light cast during a sunset, has a golden or orange glow to it. Early morning light, light from overcast days, or when your subject is in the shade of a building, often has a bluish tone to it, and is known as cool light. Whatever light source you use, keep in mind that the difference between a good photograph and a great photograph is the effective use of light. ExamplesThe following are examples and definitions of different types of lighting.
 An example of using existing lighting An example of using existing lighting
Existing Light / Available Light
Strictly speaking, existing light or ambient light covers all natural lighting from moonlight to sunshine. For photographic purposes, existing light is the light that is already on the scene or project and includes room lamps, fluorescent lamps, spotlights, neon signs, candles, daylight through windows, outdoor scenes at twilight or in moonlight, and scenes artificially illuminated after dark. Existing light is any light already existing in an indoor or outdoor setting that is not caused by any illumination supplied by the photographer.
 An example of top lighting with masks. An example of top lighting with masks.
Top Lighting
When light strikes the subject from above, such as sunlight at noon, it produces a “flat” image without any three-dimensional effect. Shadows are very short. When used on people, the effect is very unflattering, as it produces dark eye sockets and shadows cast by the chin.
 An example of a photograph where the subject is An example of a photograph where the subject is illuminated from behind, causing a silhouette. Backlighting
Backlighting is any light coming from behind the subject, toward the camera lens, so that the subject stands out vividly against the background. This sometimes produces a silhouette effect, leaving little to no detail in the subject.
 Front Lit Photo in Studio Front Lit Photo in Studio
Frontlighting/Fill Flash
When the sun is behind the photographer and facing the subject, the details in the shadows are lost especially in the eyes and under the chin. Often your subject will squint from the sun making the pose difficult for your subject. Using a fill flash will solve all your problems. In the studio front lighting will help eliminate any harsh shadows usually created by the key light.
 An example of an overexposed photo. Notice An example of an overexposed photo. Notice how details are lost in the very light areas of the photo. Overexposure
Overexposure is a condition in which too much light reaches the film, producing a dense negative or a very light print or slide.  In this photo, the image is dark and murky, as In this photo, the image is dark and murky, asthere was not enough light to take a proper image. Underexposure
Underexposure is a condition in which too little light reaches the film, producing a thin negative, a dark slide, or a muddy-looking print. 
Underexposed Landscape
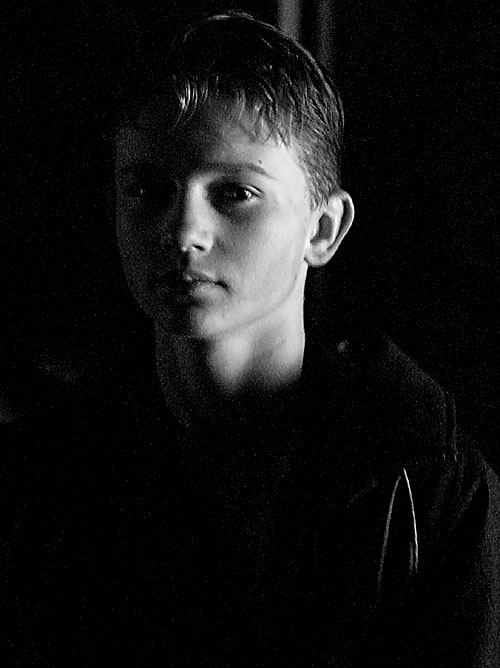
 Although the background is still quite dark, Although the background is still quite dark, the focus of the photo is the face of the young woman, and it is properly illuminated. Portrait Lighting
Portrait lighting can be achieved in various ways and the different methods of lighting a face properly are noted below: When trying to light a portrait, the lighting arrangement for a subject should consist of a minimum of three point balanced illumination. That means that two points of illumination should be placed at approximately 45 degrees on either side of the subject's face. The third point should be placed so as to illuminate the background uniformly. This is called Three Point Lighting.  Short Lighting vs. Broad Lighting Short Lighting vs. Broad Lighting
There is Short Lighting, which illuminates the side of the face turned away from the camera.
There is Broad Lighting, which illuminates the side of the face turned towards the camera.  Butterfly Lighting made famous by Actor Marlene Dietrich Butterfly Lighting made famous by Actor Marlene Dietrich
Butterfly Lighting is achieved by positioning the main light directly in front of the subject’s face, and adjusting the height to create a shadow directly under, and in line with the nose, which is often described as being ‘butterfly’ in shape, hence the name of the style. This style is considered to be a glamour style of lighting, best suited to women.
 Rembrandt Lighting Rembrandt Lighting
Rembrandt Lighting is a combination of short and butterfly lighting that creates a characteristic triangle of light on the cheek closest to the camera.
The method you use will depend on your resources, and the mood that you wish to create in the final photographic image. External resources and examplesFor further examples and some instruction in various lighting techniques, there are several online resources that you can use:
Blog Posting - The Role Of Light ReviewPost to your Blog on your website the answers to the following:
|