Assignment 2.1: Design and Produce a Photo Montage
This project will involve creating several Photo Montages, or at least one really good one. Improve on your marks by submitting extra. This shows that you have gone beyond the expectations of the assignment, which indicates extra effort was put into your creations.
This is an individual assignment, so you will each create your own work.
This is an artistic project. As such, some of you will move very quickly and finish a one quickly. If this is the case, complete several different samples trying a different backgroun and upload them all in one folder on the shared server Dropbox. You will choose your best piece and name them in numbered order with 1st choice file name ending in a 1. Some of you may spend more time creating one complex piece, instead of several simples one. If this is the case, budget your time so that you can finish by the end of the week.
Be sure to Save as you work so you don't loose any work.
You may need to do some search for samples on the internet and/or tutorials to try to learn different effects. Use www.pbase.com to look for “Photomontage” (search may only work at home...as PBase's search can be blocked...sorry). If the search does work, please make sure you avoid galleries which are obviously inappropriate.(don't view here in class as you search and viewing is tracked by ICT...view at home with parent supervision)
Your goal should be to have at least two GOOD examples...or ONE really good example that shows a more complex effort of creativity.
Follow the instruction steps below for the initial setup. You will be using similar commands to opening, copy, paste, transform, as you did with the New Kid assignment.
|

|
 This is a Photo Collage
Photo Collages vs Montages: There is a lot of confusion when it comes to these two terms. Collages are multiple images put into one picture and a Montage is taking several images removing other elements to create a surreal image; what you have been creating in the last assignment.
Instruction for setup:
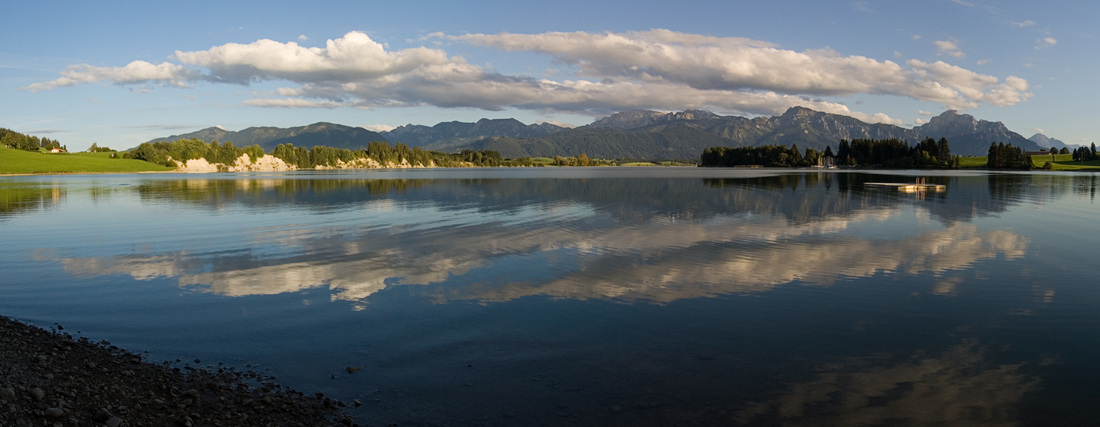
1. Choose one of the landscape images below and download the file to your desktop to start your work. These files have been preset to a resolution of 300 dpi.
2. Once you have opened the download file in Photoshop you should File>Save As> Assignment2.1_YOURLASTNAME.psd
3. Google image search various images that you would like to add to your creation. You must have a minimum of 15 layers of items in your creation.
4. Rename each layer that represents what the item is. For example if you have the CN Tower in your creation the layer the CN Tower is on should be renamed CNTower.
5. Open up your found images and Edit>Copy, Edit/Paste, Edit/Transform, to manipulate and fit as needed in your creation.
6. Isolate your found images from their background using Refine Edge Command or Background Eraser tools.

PhotoMontage1
|
| ||

PhotoMontage2
|
| ||

PhotoMontage3
|
| ||

PhotoMontage4
|
| ||

PhotoMontage5
|
| ||

PhotoMontage6
|
| ||

PhotoMontage7
|
| ||

PhotoMontage8
|
| ||
Need help with Refine Edge Command?

How to use Refine Edge - click on images to enlarge
01 Crop your start image
Open your start image in Photoshop Elements 11. To add impact to our portrait’s subject, grab the Crop tool. In the options bar, choose Use Photo Ratio, then click and drag to crop the shot as shown above. This also reduces the amount of edge areas that you’ll need to select. Click the tick to apply the crop.

02 Select the background
Next, grab the Quick Selection tool from the Tools palette. In the options bar set Size to 70 and tick Auto-Enhance. You can now spray over the background to start selecting it. To remove bits of the girl from the selection tick Subtract From Selection. Don’t worry about selecting every hair.
Next, grab the Quick Selection tool from the Tools palette. In the options bar set Size to 70 and tick Auto-Enhance. You can now spray over the background to start selecting it. To remove bits of the girl from the selection tick Subtract From Selection. Don’t worry about selecting every hair.

03 Get smart
Once you’ve selected the blurred background, choose Select>Inverse to select the girl. In the options bar click Refine Edge>View and double-click to choose On White. As the edges of the subject are both sharp and blurred, tick Smart Radius. Set Radius to 4.
Once you’ve selected the blurred background, choose Select>Inverse to select the girl. In the options bar click Refine Edge>View and double-click to choose On White. As the edges of the subject are both sharp and blurred, tick Smart Radius. Set Radius to 4.

04 Refine the radius
Choose the Refine Radius tool [E]. In the Tool options bar, set Size to 70 pixels. Click and spray to include missing hairs overlapping the blurred background. Set Feather to 1.0 to soften the strands. Set Output to New Layer with Layer Mask. Click OK.
Choose the Refine Radius tool [E]. In the Tool options bar, set Size to 70 pixels. Click and spray to include missing hairs overlapping the blurred background. Set Feather to 1.0 to soften the strands. Set Output to New Layer with Layer Mask. Click OK.

05 Add a white background
Choose Layer>New>Layer and click OK. Choose Edit>Fill Layer and select White. Click OK. Drag the white layer below the girl’s layer. Click on the Layer Mask. Grab the Brush tool and set Opacity to 20%. Spray a soft black tip over fuzzy edges to hide them.
Choose Layer>New>Layer and click OK. Choose Edit>Fill Layer and select White. Click OK. Drag the white layer below the girl’s layer. Click on the Layer Mask. Grab the Brush tool and set Opacity to 20%. Spray a soft black tip over fuzzy edges to hide them.

06 Tidy the mask
Continue spraying a soft black brush around the girl’s outline to hide remaining bits of background. Use a white tip to restore important details. Grab the Blur tool and set Strength to 100%. Click on the mask and spray around any rough edges to soften them.
Continue spraying a soft black brush around the girl’s outline to hide remaining bits of background. Use a white tip to restore important details. Grab the Blur tool and set Strength to 100%. Click on the mask and spray around any rough edges to soften them.
